This short presentation shows what tools are needed and how to install them in order to build automation framework WebDriver + Java + TestNG + Grind2 + Ant
Code example: https://github.com/viktorus/tutorial
Anyone Can Test
A Simple Approach to Software Testing
Wednesday, October 16, 2013
Thursday, March 7, 2013
Monday, June 18, 2012
Using Grid2 to run tests on multiple machines/browsers
Grid allows you to :
- Scale by distributing tests on several machines (parallel execution)
- Manage multiple environments from a central point, making it easy to run the tests against a vast combination of browsers / OS.
- Minimize the maintenance time for the grid by allowing you to implement custom hooks to leverage virtual infrastructure for instance.
Setup:
- Download the latest selenium-server-standalone-*.jar from http://code.google.com/p/selenium/downloads/list.
- Start the Hub - open CMD and run:
- java -jar selenium-server-standalone-*.jar -role hub
- Start the nodes - open CMD and run:
- java -jar selenium-server-standalone-*.jar -role node -hub http://localhost:4444/grid/register
cd c:\selenium-server (location of your server)
java -jar selenium-server-standalone-*.jar -role hub
Using Grid2 in tests:
DesiredCapabilities capability = new DesiredCapabilities();
capability.setBrowserName("firefox");
driver = new RemoteWebDriver(
new URL("http://<IP of your remote machine>:4444/wd/hub"),
capability);
More info: http://code.google.com/p/selenium/wiki/Grid2
Thursday, February 9, 2012
Webdriver: TestNG + Eclipse + Java
In the beginning it was enough to Run my tests from Eclipse just by clicking Run button. After some time I realized that I need to run tests with different setup - e.g. different users/passwords, different channels, different browsers, run particular classes/methods in groups etc. I found TestNG is what I need and even more. With TestNG it is possible to:
The installation and getting started with testng is very well described on their site testng.org - shortly:
7. Modify the XML configureation (testng.xml by default) as follows
<?xml version="1.0" encoding="UTF-8"?>
<suite name="Suite" parallel="false">
<test name="TestName" preserve-order="true">
<parameter name="usrName" value="test"/>
<parameter name="pwd" value="1234"/>
<classes>
<class name="test.TestExample">
<methods>
<include name="test1" />
<include name="test2" />
</methods>
</class>
</classes>
</test>
</suite>
8. Run testng.xml
Console results:
[TestNG] Running:
C:\workspace\webdriver\testng.xml
test1 passed
test2 passed
===============================================
Suite
Total tests run: 2, Failures: 0, Skips: 0
===============================================
TestNG results:
- parametrize tests
- run tests in separate sets grouped by classes or methods
- run tests in multiple threads
- generate test reports
- use annotations
- and more..
The installation and getting started with testng is very well described on their site testng.org - shortly:
- Open Eclipse
- Help > Install New Software...
- Add http://beust.com/eclipse repository and complete the proccess
- Window > Show View > Other.. select Java > TestNG > OK
- Create a new TestNG class for existing package (test): right-click on the package > New > TestNG class (name it TestExample)
- Copy the following code to the class
package test;
import org.testng.annotations.BeforeTest;
import org.testng.annotations.Test;
import org.testng.annotations.Parameters;
public class TestExample {
import org.testng.annotations.Test;
import org.testng.annotations.Parameters;
public class TestExample {
@BeforeTest
@Parameters({"usrName", "pwd"})
public void setUp(String
usrName, String pwd) {
// code that will be executed before tests
}
}
@Test
public void test1() {
// test1 steps
System.out.println("test1 passed");
System.out.println("test1 passed");
}
@Test
public void test2() {
// test2 steps
System.out.println("test2 passed");
System.out.println("test2 passed");
}
}
7. Modify the XML configureation (testng.xml by default) as follows
<?xml version="1.0" encoding="UTF-8"?>
<suite name="Suite" parallel="false">
<test name="TestName" preserve-order="true">
<parameter name="usrName" value="test"/>
<parameter name="pwd" value="1234"/>
<classes>
<class name="test.TestExample">
<methods>
<include name="test1" />
<include name="test2" />
</methods>
</class>
</classes>
</test>
</suite>
8. Run testng.xml
Console results:
[TestNG] Running:
C:\workspace\webdriver\testng.xml
test1 passed
test2 passed
===============================================
Suite
Total tests run: 2, Failures: 0, Skips: 0
===============================================
TestNG results:
Thursday, January 26, 2012
Getting Started with Webdriver (Java + Eclipse)
WebDriver is a tool for writing automated tests of websites. It aims to mimic the behaviour of a real user, and as such interacts with the HTML of the application. More info here.
Eclipse installation
- Download Eclipse (I use Eclipse Classic - don't really know what is the difference between all of them)
- Extract the archive to a folder (e.g. c:\eclipse)
- Run Eclipse.exe (I would recommend to create a shortcut and put it to the desktop or taskbar)
- Create a new Java Project - File/Add/Java Project. Name the project (e.g. webdriver) and accept the rest of the defaults
Webdriver setup
- Download the latest selenium-java-<newest version>.zip here
- Unzip the files into the project that you just created. I would suggest to create a folder under the project root called /lib (my example: c:\workspace\webdriver\lib\)
- Back in Eclipse, right click on your project in the Package Explorer and choose Properties -> Java Build Path
- Choose the Libraries tab and click Add External Jars...
- Select all the jars that you just unzipped into the /lib/ folder and click OK
Create a new test with Webdriver
- Add a new Package - File/New/Package (name it e.g. test)
- Select a new package and add a new class - File/New/Class. Give the class name (e.g. Test) and accept the other defaults, but make sure that public static void main(String[] args) checkbox is enabled.
- Copy the following code into your Eclipse project and Run the test!
package test;
import
org.openqa.selenium.By;
import
org.openqa.selenium.WebDriver;
import
org.openqa.selenium.WebElement;
import
org.openqa.selenium.firefox.FirefoxDriver;
public class Test {
public static void main(String[]
args) {
WebDriver driver = new
FirefoxDriver();
driver.get("http://www.google.com");
WebElement element =
driver.findElement(By.name("q"));
element.sendKeys("webdriver
how to find elements");
element.submit();
System.out.println("Test
passed!");
}
Friday, August 19, 2011
Cross-site scripting (XSS) and SQL injection testing tools
If you need to test a web application for XSS vulnerability and SQL injection there are few tools you can use. Very good in combination with Fiddler. Both are easy-to-install Firefox addons.
NOTE: don't support FF4 - work OK with FF3.6
Thursday, August 5, 2010
Using multiple profiles in Firefox
I have noticed that using multiple profiles in Firefox (with different sessions, cookies, cache and preferences) is extremely useful feature. If someone doesn’t know how to use it - here is the simple steps:
1. Right-click on Firefox shortcut (from Quick Lunch or Desktop) and select Properties
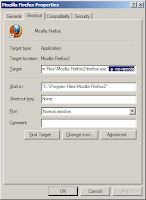
2. Enter the following string to the Target field “-p –no-remote” as shown below

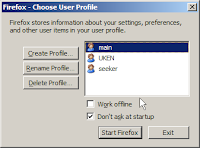
3. Save changes and click on the Firefox shortcut – User Profile dialog will be displayed before Firefox is started

4. Create few profiles for your needs with different preferences – so you can use different profiles separately without sharing the sessions
Enjoy!
1. Right-click on Firefox shortcut (from Quick Lunch or Desktop) and select Properties
2. Enter the following string to the Target field “-p –no-remote” as shown below

3. Save changes and click on the Firefox shortcut – User Profile dialog will be displayed before Firefox is started

4. Create few profiles for your needs with different preferences – so you can use different profiles separately without sharing the sessions
Enjoy!
Subscribe to:
Comments (Atom)


